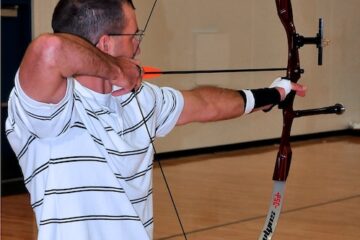
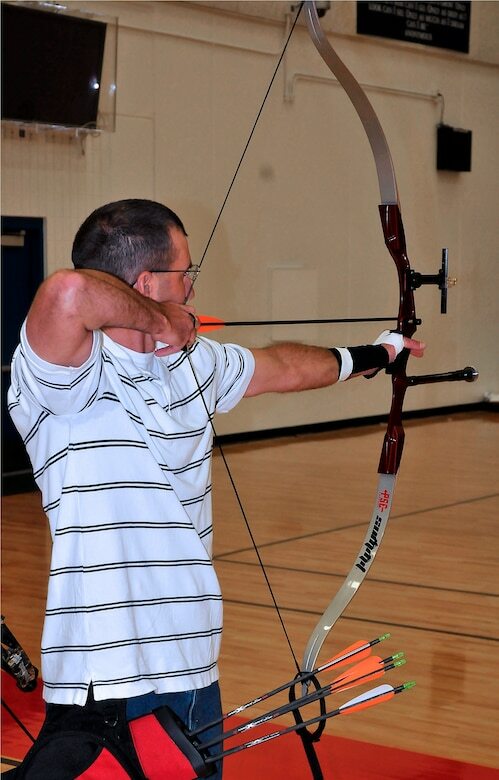
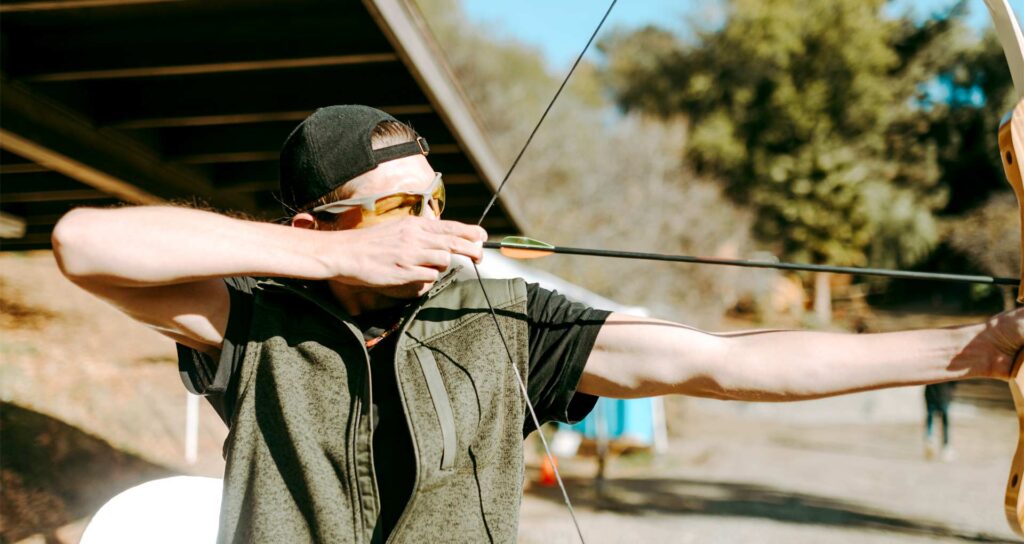
To draw a bow, simply hold it parallel to the ground, place the arrow on the arrow rest, and pull the bowstring back to your anchor point, using your dominant hand. As you pull back, focus on keeping your elbow up and your wrist straight, while using your back muscles to maintain a steady draw.
Archery is an ancient practice that has evolved into a modern sport, of which drawing a bow is a fundamental skill. Whether you are a beginner or an experienced archer, learning how to draw a bow properly can greatly enhance your accuracy and consistency.
In this article, we will guide you through the process of drawing a bow, step by step, and provide useful tips and techniques to help you improve your form. So, let’s get started!
Understanding Bow Anatomy
Archery is an ancient practice that has been enjoyed around the world for centuries. However, like any other sport, it takes time and practice to master. One of the major components of archery is understanding your bow. The anatomy of a bow is complex and plays a critical role in the drawing process.
Here is a detailed breakdown of the different parts of a bow and how they affect the shooting process.
A Detailed Breakdown Of The Different Parts Of A Bow
- The riser: This is the central component of the bow that contains the grip. It is the part of the bow that you hold on to while shooting.
- The limbs: These are the flexible parts of the bow that curve back and store the energy that is released when the bowstring is released.
- The cam: This is a wheel or set of wheels that helps to reduce the amount of force required to hold the bowstring back.
- The string: The string is responsible for transferring the energy from the limbs to the arrow.
- The nock: This is the small notch at the back of the arrow where the bowstring is placed.
How Each Part Of The Bow Affects The Drawing Process
- The riser: The weight and shape of the riser affect the balance of the bow and the ease of aiming.
- The limbs: The length, width, and material of the limbs all play a significant role in the bow’s draw weight and speed.
- The cam: The cam’s size, shape, and positioning greatly impact the amount of force required to hold the bowstring back, known as draw weight.
- The string: The string’s material and length influence the bow’s performance and speed.
- The nock: The size and shape of the nock determine how the arrow fits onto the string and how easy it is to release.
Understanding bow anatomy is an essential part of archery. Knowing the different parts of the bow and how they affect the shooting process can help you to choose the right equipment and improve your aim. So, whether you are a seasoned archer or a beginner, take the time to understand your bow, and you will be on your way to becoming a better archer.
Finding The Right Bow
Factors To Consider When Choosing A Bow
When it comes to archery, there’s nothing more important than finding the right gear. The bow is, of course, the most essential piece of equipment. Choosing the right one means finding a bow that suits your body type, skills, and goals.
Here are some of the factors to keep in mind while selecting your perfect bow:
- Draw weight:
One of the most crucial factors to consider when choosing a bow is its draw weight. The draw weight is the amount of force needed to draw back the bowstring. It’s usually measured in pounds (lbs), and it depends on your strength.
A general rule of thumb is that the draw weight should be around 70-80% of your body weight. For example, if you weigh 150 pounds, the ideal draw weight would be between 105 and 120 pounds.
- Draw length:
The draw length is the distance between the bowstring and the bow’s grip when the arrow is fully drawn back. A bow with the wrong draw length could cause discomfort, accuracy problems, or even result in an injury. To measure your draw length, there’s a simple trick: stand straight against a wall and stretch out your arms horizontally.
Measure the distance from fingertip to fingertip, and then divide it by 2. 5. The result is your draw length.
- Axle-to-axle length:
The axle-to-axle length is the distance between the bow’s cams or wheels. It determines the overall size of the bow and affects its maneuverability. A longer axle-to-axle length usually means more stability and accuracy, while a shorter one provides better maneuverability and speed.
- Bow length:
The overall length of the bow is another important factor that affects its stability and speed. Longbows, for example, are usually taller than the archer and offer smooth shooting and accuracy. Recurve bows are shorter and lighter, making them ideal for beginners or hunters.
Compound bows are the most popular and versatile type, with a pulley and cable system that reduces the draw weight and makes them easier to shoot.
Importance Of Getting The Right Bow For Your Body Type And Skill Level
Getting the right bow is not just about picking one based on its looks or price. It’s all about finding a bow that matches your body type, skill level, and archery goals. A bow that is too heavy, too long, or too short can lead to poor shooting form, muscle strain, or even accidents.
On the other hand, a properly fitted bow can help you shoot more accurately, with less effort and more confidence.
It’s important to keep in mind that archery is a sport that requires patience, practice, and discipline. You’ll need to invest time and effort to improve your skills and achieve your goals. But having the right bow is the first step towards success.
Overview Of Different Types Of Bows And Their Pros And Cons
There are three main types of bows commonly used for archery: longbows, recurve bows, and compound bows. Each type has its own characteristics, advantages, and disadvantages. Here’s a brief overview of each type:
- Longbows:
Longbows are the oldest and most traditional type of bow. They are tall, with a round or d-shaped cross-section, and have a simple design. Longbows require more skill to shoot accurately and consistently than other types of bows, but they offer a smooth and quiet shooting experience.
They also have a long and rich history, making them ideal for archery enthusiasts and historical reenactors.
- Recurve bows:
Recurve bows are named after their curved shape at the tips, which allows them to store more energy and shoot faster than longbows. They are shorter and more lightweight than longbows, making them easier to carry and shoot. Most recurve bows are made of wood or synthetic materials and are ideal for beginners, hobbyists, and hunters.
The main disadvantage of recurve bows is that they are less versatile than other types, as they are not suitable for bow fishing, bowhunting, or other specialized
- Compound bows:
Compound bows are the most modern and popular type of bow. They use a system of pulleys and cables to reduce the draw weight and make them easier to shoot. Compound bows are faster, more powerful, and more accurate than other types and come in a wide range of sizes and configurations.
They are ideal for hunters, competitive archers, and anyone who wants a reliable and versatile bow. The main downside of compound bows is that they require more maintenance and are more complex than other types, making them less suitable for beginners or traditionalists.
Choosing the right bow is crucial for anyone who wants to enjoy archery safely and effectively. Keep in mind your body type, skill level, and goals, and don’t hesitate to try different types of bows until you find the one that suits you best.
Proper Stance And Grip
The Importance Of Proper Stance And Grip When Drawing A Bow
As you begin your archery journey, it is crucial to pay attention to your stance and grip. Your stance plays a significant role in maintaining stability and balance, while a proper grip is essential for ensuring accuracy and consistency when drawing a bow.
Here are some key points to keep in mind:
Tips For Finding The Correct Stance And Grip
- Stance
- Stand with your feet shoulder-width apart and perpendicular to the target line.
- Keep your toes pointed outward at a 45-degree angle.
- Distribute your weight evenly on both feet.
- Maintain a relaxed and comfortable posture.
- Grip
- Hold the bow grip with your non-dominant hand.
- Place the grip in the soft, fleshy area of your hand between your thumb and index finger.
- Keep your fingers relaxed and wrapped around the grip, but avoid gripping too tightly.
- Don’t grip the bow too high or too low. Just above the lifeline on your hand.
By focusing on your stance and grip, you can lay a solid foundation for shooting with accuracy and consistency. With time and practice, these fundamentals will become second nature, allowing you to focus on other aspects of the archery experience.
Setting Up The Draw
To get the most accuracy and consistency out of your shot, it’s essential to properly set up your draw. This involves getting your positioning and technique right as you nock your arrow and prepare to draw the bow. Here’s a rundown of how to do it.
How To Properly Nock An Arrow
Nocking an arrow refers to positioning the back end of the arrow on the bowstring, ready for the draw. Here’s the right way to do it:
- Hold the arrow by the end and position it onto the arrow rest on the bow’s handle.
- Take the nock and place it between the string’s two perpendicular strands, and then hook it onto the string.
- Make sure that the nock is securely placed on the string, and that the arrow is straight and parallel to the bow’s handle.
Setting Up Your Bow Hand And Wrist
Proper placement and angle of your bow hand and wrist can make a significant difference in your accuracy and precision. Here’s how to do it:
- Start by firmly gripping the bow handle with your non-dominant hand, making sure that your hand is perpendicular to the bow’s handle.
- Next, rotate your wrist slightly to the inside, so that your thumb is positioned towards the bow’s center.
- Finally, curl your fingers around the bow grip, completing your hand placement.
Importance Of Hand Placement On The Bowstring
The placement of your fingers on the bowstring can also have a crucial impact on your shot. Here’s what you need to know:
- Your string hand should be extended towards the target while your bow hand is tilted forward slightly.
- Place your index finger above the arrow nock, while your middle and ring fingers are just below it.
- Use a consistent and relaxed grip to minimize torque and scraping against the arrow rest, which can lead to inconsistency.
By following these steps, you’ll be able to set up your draw just right, making for a more consistent and accurate shot. Remember to practice regularly to build muscle memory and further improve your technique.
Drawing The Bow
The process of pulling a bowstring to full draw can be challenging, especially for beginners. It involves several steps and requires a certain level of physical strength and technique. Properly executing the process is crucial, as it can have a significant impact on the accuracy and consistency of your shots.
In this section, we’ll go over a step-by-step guide to drawing the bow, as well as common mistakes to avoid and the correct technique for pulling the bowstring.
Step By Step Guide To Drawing The Bow
Here are the key steps involved in drawing a bow:
- Stand in the correct position:
- Stand perpendicular to the target, with feet shoulder-width apart.
- Align your body with the bow.
- Keep your back straight and shoulders relaxed.
- Nock the arrow:
- Place the arrow on the arrow rest.
- Insert the arrow’s nock onto the bowstring.
- Grip the bow:
- Hold the bow handle with your non-dominant hand.
- The grip should be relaxed, but firm enough to prevent the bow from twisting in your hand.
- Extend your bow arm:
- Point the bow towards the target.
- Fully extend your bow arm in the direction of the target.
- Use your back muscles to draw the string:
- Grasp the bowstring with your dominant hand, using the fingertips and not the pads of your fingers.
- Pull the bowstring towards your face by using the muscles in your back.
- Anchor the string:
- Bring the bowstring to the corner of your mouth or your chin.
- Create a consistent anchor point every time you draw the bowstring.
- Aim and release the arrow:
- Aim directly at your target.
- Release the arrow by relaxing your fingers and allowing the bowstring to slip free.
Common Mistakes To Avoid When Drawing A Bow
Here are the common mistakes that you should avoid when drawing a bow:
- Gripping the bow too tightly: This can cause the bow to twist in your hand and disrupt your aim.
- Using too much force to pull the string: This can cause fatigue and affect your accuracy.
- Not anchoring consistently: Not having a consistent anchor point can create inconsistencies in your shots.
- Overdrawing the bow: This means pulling the string beyond your comfortable draw length and can cause discomfort, fatigue, and affect your accuracy.
- Jerking or releasing the bowstring inconsistently: This can cause erratic shots.
Explanation Of The Correct Technique For Pulling The Bowstring
Now let’s talk about the correct technique of pulling the bowstring:
- Use the back muscles to draw the string: This helps to distribute the weight of the draw across your back muscles instead of relying solely on your arm strength.
- Maintain a relaxed grip: This reduces tension in your hand and allows the bow to stay steady, resulting in more accurate shots.
- Anchor consistently: This ensures that you have the same reference point every time you draw your bow, resulting in more consistent shots.
- Keep your bow arm fully extended: This helps to create more stability and accuracy in your shot.
- Release the arrow smoothly and consistently: This helps maintain the bow’s position and allows the arrow to fly consistently, resulting in more precise shots.
Holding The Draw
Holding a draw is crucial to archery, and this technique requires patience, strength, and consistency. Improper draw holding can cause muscle fatigue and increase your chances of missing the target. In this section, we will discuss how to hold the draw, maintaining a consistent anchor point, and tips for improving your aim.
How To Hold The Draw
To hold the draw, follow these steps:
- Keep your bow arm steady, and do not move it.
- Keep your shoulder blades down and level.
- With your drawing hand, keep the elbow high and the wrist straight.
- Pull the arrow to the anchor point, and keep it there.
- Use your back muscles to hold the draw and keep your hand relaxed.
The Importance Of Maintaining A Consistent Anchor Point
A consistent anchor point will ensure that you have a consistent aim, which is key to hitting the target. Otherwise, your arrow may go left, right, or even worse, miss the target entirely. Here are some tips for achieving a consistent anchor point:
- Choose an anchor point that feels comfortable and natural to you.
- Make sure that you anchor in the same spot each time you pull back the bowstring.
- Use a reference point to ensure that your anchor point remains consistent.
Tips For Improving Your Aim While Holding The Draw
To improve your aim while holding the draw, try these tips:
- Focus on your breathing. Take a deep breath, hold it for a few seconds, and then exhale slowly.
- Keep your eyes on the target. Visualization is key.
- Use a pin sight or a peep sight to help you aim.
- Relax your grip on the bow and the string.
- Use your back muscles to hold the bow steady.
Holding the draw is a crucial technique that requires strength, patience, and consistency. Maintaining a consistent anchor point and improving your aim will increase your chances of hitting the target and prevent muscle fatigue. With these tips, you’ll be a pro at holding the draw in no time.
Releasing The Bow
How To Release The Bowstring
Releasing the bowstring is a critical part of shooting accurately and consistently. Here’s how to do it:
- Keep your fingers relaxed and your grip firm but not too tight on the bowstring.
- Use your back muscles to pull the bowstring back, keeping your elbow high and in line with your shoulder.
- When you’re ready to release, let your fingers slide off the string in a smooth motion, without jerking or twisting your hand.
Remember, the release should feel effortless and natural. Practice your release technique regularly to make it second nature.
Common Mistakes To Avoid When Releasing The Bow
Making mistakes when releasing the bow can negatively affect your accuracy. Here are some common mistakes to avoid:
- “plucking” the bowstring instead of releasing it smoothly and evenly.
- Jerking or twisting your hand when you release, which can cause the arrow to fly off course.
- Applying too much pressure or tension to the string, which can cause the arrow to fly too high.
To avoid these mistakes, focus on keeping your release smooth and natural, using your back muscles to control the pull and release of the bowstring.
The Importance Of A Clean Release For Accuracy And Consistency
A clean release is essential for accuracy and consistency in archery. When you release the bowstring smoothly and without any unnecessary movement, the arrow will fly straight and true to its target.
On the other hand, a sloppy release can cause the arrow to fly off course or lose energy and drop before reaching the target. Consistency in your release technique is also important, as it helps you develop muscle memory and ensure that each shot is as accurate as the last.
Mastering your release technique is crucial to becoming a skilled archer. By avoiding common mistakes and focusing on a clean, consistent release, you’ll be well on your way to hitting your targets with greater accuracy and precision. Remember to practice your release regularly to make it a natural part of your shooting technique.
Follow Through
Explanation Of The Importance Of Follow Through
Follow through is the crucial part of executing a shot, which can make the difference between a good and a bad one. Maintaining proper follow-through form is the foundation of effective shooting, as it helps in preventing jerky movements and inconsistent shots.
In archery, follow through refers to the body posture and movement after releasing the arrow. A smooth follow-through will increase your accuracy and reduce any discomfort or injury that results from inconsistent shooting styles. By holding your posture until the arrow hits the target, you contribute towards delivering a straighter shot with consistent power.
Tips For Maintaining Good Follow Through
To maintain good follow-through form, you must establish and stick to a routine. The following tips can be helpful:
- Relax: Let your body relax naturally, without any forced movements. You don’t need to exert too much pressure.
- Hold your bow: Keep your bow hand steady and in place after the shot, don’t drop it in a hurry.
- Keep your stance: Maintain your stance on the ground, don’t rush to retrieve the arrow.
- Observe: Keep an eye on your arrow as you follow through, it can provide feedback on your accuracy.
- Be patient: Allow the bow to complete its natural motion cycle before standing up.
- Practice: The more you practice, the more you will improve your ability to maintain good follow-through form.
By incorporating these tips into your shooting routine, you will notice greater consistency and accuracy with every shot. Remember, good follow-through is essential to maintaining a stable and accurate archery form.
Troubleshooting
Archery can be a fun and thrilling activity, but like any sport, it takes time, effort, and practice to perfect your technique. It’s not uncommon to experience a few hurdles along the way. Here are some common issues and mistakes to avoid, tips for improving your technique, and strategies for overcoming common challenges.
Common Issues And Mistakes To Avoid
Mistakes can easily cause unintended consequences and decrease your shot accuracy. Here are some of the common issues and mistakes that archers make, so you can avoid them:
- Breaking the bowstring with the wrist: Avoid breaking the bowstring by using your arm muscles and not your wrist. Wrist pressure can damage the bow and decrease your accuracy.
- Flinching during the release: Flinching can be a cause of missed targets. Try to relax and release the bow naturally without any sudden movement.
- Incorrect grip: Your grip can have a significant impact on your accuracy. A proper grip should be a relaxed one, focusing on your fingertips rather than your palm.
- Not aiming correctly: Aim for the gold and align the bow and arrows accordingly. Avoid making any alterations once your arrow has been drawn.
Tips For Improving Your Technique
If you want to improve your technique and performance, include these tips in your practice session:
- Practice your form: Focus on your posture and body mechanics, keeping your shoulders level and your bow arm straight. Monitor your breathing, and try to keep your movements smooth.
- Increase your draw weight: Increase the draw weight as you build strength. Any increase above your current weight should be gradual to avoid any strain or negative impact on your accuracy.
- Shoot regularly: Practice regularly, even if it’s just a few shots per day. Consistency is key in improving your overall accuracy.
- Master your sight pins: Get to know your sight pins well, and adjust according to your distance from the target.
Strategies For Overcoming Common Challenges
Encountering common challenges in archery is inevitable. Here are some strategies to overcome them:
- Stay focused: Keep distractions to a minimum to stay focused on your shots.
- Adjust your aim as needed: If you’re consistently missing the target, recheck your aim and adjust the sight pin as needed.
- Seek feedback: Ask for feedback from a coach or fellow archer to identify areas of improvement.
- Experiment with different gear: Try different types of equipment to find what works best for you.
By avoiding common mistakes, practicing proper technique, and adapting to challenges, you can improve your accuracy and become a master archer. Keep these tips in mind, and you’ll be shooting like a pro in no time.
Frequently Asked Questions
What Is Bow Drawing In Archery?
Drawing a bow is the act of pulling the string back before releasing an arrow.
What Is The Proper Way To Stand When Drawing A Bow?
Stand straight and perpendicular to the target with your feet shoulder-width apart, and toes facing the target.
How Do You Grip The Bow When Drawing?
Grip the bow handle firmly but not too tight; ensure your grip is consistent with every shot.
How Do You Anchor The Bowstring On Your Face?
Anchor the bowstring at the corner of your mouth while keeping your head straight and in line with the arrow.
Is It Essential To Use The Right Bowstring?
Yes, using the right bowstring is crucial as it determines the draw weight, length, and speed of the arrow.
What Are The Different Types Of Bows For Archery?
The different types of bows for archery are recurve, compound, longbow, and crossbow.
How Often Should You Practice Drawing A Bow In Archery?
To maintain consistency and form, practice drawing a bow at least three times a week.
Conclusion
As we come to the end of this post, we can conclude that drawing a bow is an essential technique that every archer should master. It requires proper positioning of body and mind to get the perfect shot. One needs to practice consistently with patience and dedication to achieve the desired accuracy.
Following the correct steps and techniques mentioned in this post will help to develop muscle memory, which will ultimately lead to better results. Remember to focus on a steady hand, a straight arm, and a relaxed release. Keep in mind that every archer is unique, so practicing and adjusting accordingly to what feels right for your body will make all the difference.
With continuous practice, you can master the art of drawing a bow and excel in the wonderful sport of archery. Happy shooting!